 |
| Fig.1 Ordinary Kitchen Yellow Straw Broom |
Tools and Supplies:
Matches
Nylon Twine
Yellow Straw Broom (Worn out)
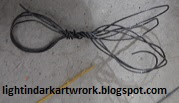
Wood glue (Titebond)
Wire (thin)
There never seem to be enough money to purchase all the supplies needed to paint with on my canvases. My current thinking is the many ways to get my project done as inexpensive as possible. When the garage was cleaned a old broom needed to be disposed, instead of trashing it, the straw strands were removed and a brush was created. Below are those steps.
This post shows the eight steps of how to make a straw brush.
Step 1: Fig.1 and fig.2 shows the broom that was used to create this painting brush. The entire broom could make easily several brushes. Fig.2 shows that a utility knife was used to cut the straw strands away from the base of the broom. Fig.3 shows the cut straw strands that are the painting fibers of this homemade brush.
 |
| Fig.2 Cutting the straw |
 |
| Fig.3 Straw strands |
 |
| Fig.4 Wrapping the straw on a wood stick |
 |
| Fig.5 Use lit matches to fuse the nylon end |
 |
| Fig.6 Nylon twine fused |
 |
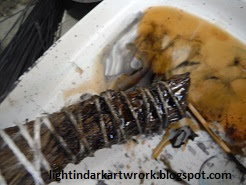
| Fig.7 After the glue |
 |
| Fig.8 Wood sealer for wood handle |
 |
| Fig.9 Dark sealer |
 |
| Fig.10 Metal brush handle |
 |
| Fig.11 Applying first coat |
 |
| Fig.12 Several coats |
 |
| Fig.13 Finished Brush |
- Handyman Blog: DIY Advisor
- Food Blog: From Kiwis To Pistachios
- Artwork Blog: Light in Dark Artwork
- Class-A Tests: DIY Class-A Drivers License Tests
- Class-A Tests Sitemap: Class-A Sitemap
- Cookie Alert: European Union laws requires that you know that this blog uses cookies. If you are concerned about this please click here to see how Google uses this information.
Note: Light in Dark Artwork assumes no liability for omissions, errors or the outcome of any Artist projects. All rights reserved. © Copyright 2011-

No comments:
Post a Comment