Showing posts with label Matches. Show all posts

Monday, July 10, 2017

How to Make a Brush from a Worn Out Yellow Straw Broom

Fig.1 Ordinary Kitchen 
Yellow Straw Broom
 By Gary Boutin

Tools and Supplies:
Matches
Nylon Twine
Yellow Straw Broom (Worn out)
Wood glue (Titebond)
Wire (thin)

There never seem to be enough money to purchase all the supplies needed to paint with on my canvases. My current thinking is the many ways to get my project done as inexpensive as possible. When the garage was cleaned a old broom needed to be disposed, instead of trashing it, the straw strands were removed and a brush was created. Below are those steps.

This post shows the eight steps of how to make a straw brush.


Step 1: Fig.1 and fig.2 shows the broom that was used to create this painting brush. The entire broom could make easily several brushes. Fig.2 shows that a utility knife was used to cut the straw strands away from the base of the broom. Fig.3 shows the cut straw strands that are the painting fibers of this homemade brush.
Fig.2 Cutting the straw
Fig.3 Straw strands
Step 2: Fig.4 shows that the next step is to gather the straw strands on a wooden handle. A wood stick was with nylon twine to gather the strands together.
Fig.4 Wrapping the straw on a wood stick
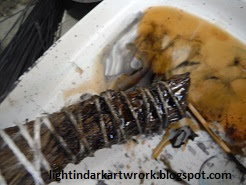
Step 3: Fig.5 shows that the straw strands are on the handle, but to prevent the nylon twine from unwrapping itself, the use of matches will be used to fuse the ends to the base of the handle. The matches must be lit and its the fire fuses the nylon thread from unwrapping. Fig.6 shows the nylon twine has been fused.  

Fig.5 Use lit matches 
to fuse the nylon end
Fig.6 Nylon twine fused
Step 4: Fig.7 shows the brush is assembled. Fig.8 shows that to protect the wood handle and to provide another layer of protection a wood sealer was used on the brush handle.

Fig.7 After the glue
Fig.8 Wood sealer 
for wood handle
Step 5: Fig.9 shows the application of the wood sealer.
Fig.9 Dark sealer
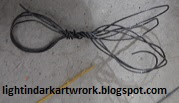
Step 6: Fig.10 shows that a metal loop was added to the end of the brush to be able to hang the brush while drying.

Fig.10 Metal brush handle
Step 7: Fig.11 shows the application of the wood sealer to the brush handle. Fig.12 shows the handle completely covered with the sealer.

Fig.11 Applying first coat
Fig.12 Several coats
Step 8: Fig.13 shows the finished brush. The metal loop at the top of the brush handle provided a way to dry the fibers after each painting projects. Once the brush was finished it made a handy little broom or brush. The wood sealer does not need to be applied if the brush is only going to be used once. The wood sealer was added to make the brush handle last while cleaning with water and soap. The yellow brush straw strands are not the finest quality for detail painting but this brush can add another tool that could be used in your painting.

Fig.13
Finished 
Brush


  • Cookie Alert: European Union laws requires that you know that this blog uses cookies. If you are concerned about this please click here to see how Google uses this information.

 
Note: Light in Dark Artwork assumes no liability for omissions, errors or the outcome of any Artist projects. All rights reserved. © Copyright 2011-

Sunday, October 23, 2016

How to Make a Bird of Paradise Art Brush - Part 1 of 2 - Assembly

Fig.1 Supplies
By Gary Boutin

Tools and Supply:
Birds of Paradise dried flower (free)
Matches
Rubber bands (2) free
String (parcel)
White nylon rope
Wood branches (free)
Wood glue

This post shows how to make a paint brush from scratch using material that are all around you. The handle of this brush is part of tree branch which was free and a curved handle was chosen to make it different than standards straight brushes. The brush itself is from a Bird Of Paradise dried flower. The flowers are at first held by two rubber bands in the beginning and later replaced with parcel string. The handle has a layer of thicker twine to give it more comfort and control. This post has two parts the first shows how the brush was made. The second show does the brush work, how it works with paint and does it work well enough for your art studio. This brush will not have the same life as a store bought brush because it is made of totally nature made materials.

This post shows the five steps of making an Bird of Paradise Art Brush. 

Step 1: Fig.1 shows the tree leaves sticks and bird of paradise flowers. The arrow point to the tree branches used in the handle of these brushes. Fig.2 shows the parts of the brush that have not been put together yet. Fig.3 shows the arrow points to the rubber bands that held the flowers in place until  the twine was wrapped around the flowers and the wood branch handle. Fig.3 and fig.4 shows the first step is to take the flowers together and make a bunch to add them to the wooden branch. Fig.5 shows the second rubber band was used to apply pressure to the end of the dried flowers.
Fig.2 Weeds
Fig.3 First rubber band
Fig.4 Place the 
flowers on the end

Fig.5 Second 
rubber band
Step 2: Fig.6 shows that once the flower are held in place by the parcel string a wood glue painted on the twine. Fig.7 shows the wood glue placed in a small bottle. 
Fig.6 String
Fig.7 Wood glue
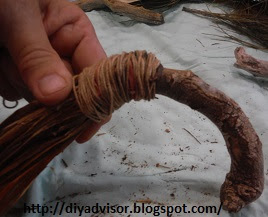
Step 3:  Fig.8 shows that a larger nylon rope is being added to the curved wood branch handle. Fig.9 shows another layer of wood glue was added to the brush handle.
Fig.8 Rope handle
Fig.9 Glue to handle
Step 4:  Fig.10 and fig.11 shows that a second layer of glue was added to the brush handle. the front and back of the decorated magazine holder. Fig.11 shows that the bottom end of the rope was tied and tucked in to prevent unraveling. 
Fig.10 Finishing 
the handle
Fig.11 Tucking
the ends


Step 5:  Fig.12 shows that the ends of the nylon rope needs to be melted. At the beginning and at the end of the twisted twine there are two ends that needed to be sealed. Melting the loose leads of the nylon twine by using flames from matches will prevent the plastic rope from coming intertwined.
Fig.12 Matches
 The second part of this post will show how this bird of paradise brush
Fig.13 Flower brush
How to Make a Bird of Paradise Art Brush

  • Cookie Alert: European Union laws requires that you know that this blog uses cookies. If you are concerned about this please click here to see how Google uses this information.

 
Note: Light in Dark Artwork assumes no liability for omissions, errors or the outcome of any Artist projects. All rights reserved. © Copyright 2011-